People generally start working out because they want to look better or feel better about the body they are in. They want to jump right into ass-kicking workouts and shed that unwanted fat immediately. This is great and I encourage it! There is one catch, most individuals don’t move properly and they don’t respect the basic movement patterns.
Moving improperly over years will result in pains that will lower the quality and enjoyment of your life. No one wants this. In addition to lowering the quality of life, you’ll slow down your potential progress. Progress will be slower because when we move improperly, we are not getting full activation of the muscles we are trying to develop. We are relying on our joints and secondary muscles to make up for the lack of force being output by the main muscle we are working. Less activation from the main muscle we are trying to use means we are going to burnfewers calories. As we all know fat loss occurs from burning more calories than we are consuming, so this is a red flag. With the excess stress on the secondary muscles and joints, we are putting those tissues at risk to be injured and putting our joints at risk to be worn downunnecessarily n.
This is exactly why I want to write on the importance of the 6 foundational movement patterns everyone should be able to perform. This is what is going to guide you to safe and effective workouts. This all ties into the move good, feel good and look good portion of this blog. Let’s get one thing straight. Looking good, being strong, and having low body fat is a by-products of moving well and having a good diet. Don’t focus so much on looking a certain way that you forget to focus on your movement technique. That will just limit potential progress. If you’re moving right and eating clean the results will follow!
Let’s get into it! Here are the 6 foundational movements everyone should be able to effectively perform!
-Squat
-Hip Hinge
-Lunge (Single Leg)
-Upper Body Push
-Upper Body Pull (Horizontal & Vertical)
-Loaded Carry
SQUAT
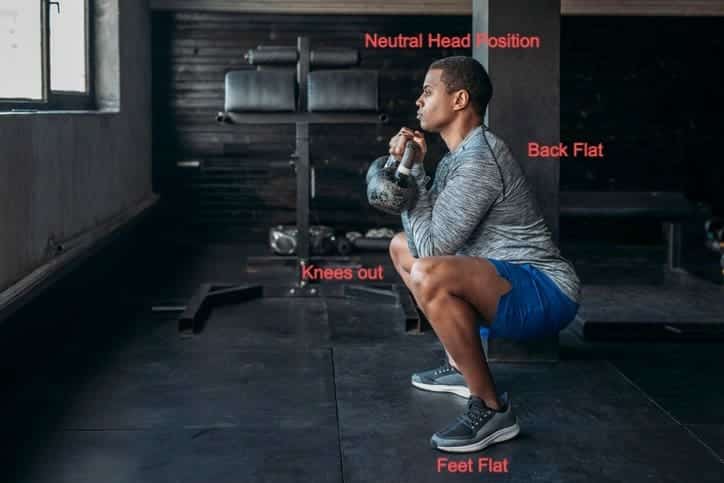
This is my personal favorite because it’s the most technical and has its full body. If I had to pick only one exercise for all of my clients to do forever, this would be the one. Everyone’s squat is a little different due to their specific genetic makeup. Don’t try and copy someone else’s squat! Everyone has their way of moving. A common problem in people first squatting is they don’t think about the movement and creating internal tension. They just go for it. When squatting, make sure your feet are set, the core is braced and the chest is up. Pay attention to your feet and your descent. If your descent on the squat is mediocre then your ascent will be mediocre as well. Here are some certain things you’ll always want to do to ensure you’re safely performing a proper squat. Let’s start from bottom to top.
- Feet always flat on the floor
- Grab the floor with your toes to create an arch under your foot and stable ankles
- Stabilize ankles and do not let them cave-in
- Rotating or pushing the knees out, However, you want to look at it, you want to keep your knees out and never let
them cave in through the entire movement - Stabilize the hips in a neutral position by bracing your abs ( when I say neutral position, I mean have your hips
perfectlyuprighth , you want to avoid your hips dumping forward). This can cause impingement in the front of your
hips if you continuously squat while you’re hips are in a tilted position. - Pull the shoulder blades down and together so you have constant tension in your back.
- Look straight ahead
- Squat it on down!
Sample Squat Variations:
-Body Weight Squat
-Goblet Squat
-Barbell Back Squat
-Barbell Front Squat
-Barbell Zercher Squat
-Box Squat
-Pause Squat
-Tempo Squat
HIP HINGE
The hip hinge is usually the most difficult for individuals to perform properly. Many people that come to see me have a habit of creating flexion in their low back to perform this movement. This is not correct, the spine should remain in a neutral position (straight). This movement occurs by rotating the hips forward and pushing them back, not by bending of the lower back. When bracing the abs properly and hinging at the hips, you should feel this exercise in the glutes, hamstrings and for some the upper back. One easy way to get an idea of what this movement entails is stand upright with your hands hanging down on your thighs. From this position, bring your hips back with a flat back while keeping pressure on your thighs with your hands. The farther your hips go back the farther your hands will go down. For most people they will reach full range of motion with their hip hinge once their fingers reach roughly below their knee caps. Going through the hip hinge keep these things in mind.
-Feet Flat on the floor, as you go back you might have a little more pressure on the heels but keep digging your toes
into the ground
-Push the knees out, externally rotate your femur, create tension in your hips. However you look at it, don’t let your
knees cave in, this takes away from glute engagement.
-Properly brace your core and create tension 360 degrees around your torso.
-Pull your shoulder blades into your back pocket and squeeze them together tightly.
-Bring the hips back and hip hinge!
Its ok to have a little lean forward to balance as long as you keep your back flat. Don’t try and stay perfectly upright.
Sample Hip Hinge Variations:
-Kettlebell Romanian Deadlift
-Barbell Romanian Deadlift
-Zercher Romanian Deadlift
-Barbell Deadlift
-Glute Bridges
-Barbell Rack Pulls
-Snatch Grip RDL
-Kettlebell Swings
LUNGE VARIATION (SINGLE LEG)
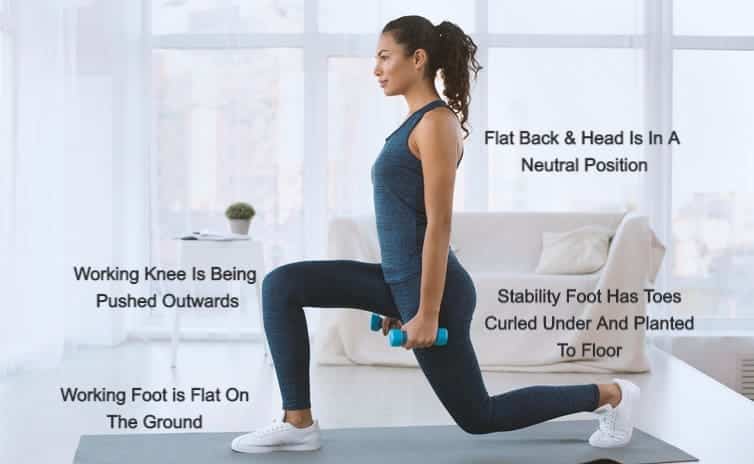
The lunge movement pattern is a single-leg-based squat movement. This can be any variation of a split squat, lunge, rear foot elevated squat, step up, lateral squat etc. Many people neglect this movement pattern in their workouts from my experience. Why do they skip them? Simply the fact they are difficult and most people fail to understand the importance of single-leg exercises and the stability and strength that come with doing them. They aren’t easy by any means and I find them very challenging. The benefits that come with them are exponential. Hip Stability, glute development, balance, power, and overall strength. One of the key factors when performing single-leg exercises is to understand which leg is doing the work and holding the load. Often people will distribute force through both legs when one of the legs is meant to be used for stability. Another common problem is the single-leg doing the work will lack stability so the knee will collapse which isn’t going to kill you, but it’s going to minimize the efficiency and productivity of the movement. Keeping tension throughout your entire body is crucial for every movement but especially with single-leg variations. Let’s go over some specific key points when working on this movement.
-Make sure the working leg ( the leg that’s producing the force for the movement) is secure on the platform you’re
performing the movement from.
-Make sure the ankle of the working leg is stable (not caving in or rolling out)
-Rotate/push the working leg outward to stabilize the hips (DO NOT LET THAT KNEE COLLAPSE IN)
-Make sure your torso is braced and not twisting. Keep the shoulders aligned over your hips.
-Upper back squeezed tight together and head in a neutral position
Examples of Single-Leg Exercises:
-Split Squat
-Lunge
-Walking Lunge
-Step Up
-Lateral Squat
-Rear Elevated Single Leg Squat
-Pistol Squat
-Step Downs
UPPER BODY “PUSH”
A functional upper body is just as important as a functional lower body. The only issue with upper body push exercises with most people is they don’t have proper scapulohumeral rhythm. This is a fancy trainer’s way of saying that the bone in your arm doesn’t work in sync with the shoulder blades as it should. When we raise our arms, our shoulder blades should rotate upward in sync with the arm(s)being raised. With most individuals, their shoulder blades don’t move as they should or they are not creating enough stability in their upper back. When this happens, you’ll see individuals shrug in an attempt to create stability. Sometimes this will happen due to a lack of the ability to rotate the shoulder blade properly as well. an example of this would be people doing push-ups and as they go down, they shrug up or with an overhead press, instead of getting full extension they will shrug upon extension of the arm and still have a slight bend in their elbow.

We can fix these kinds of things and get the most out of our pushing exercises by focusing on a few key things. Some pushing exercises can be standing, seated, or laying down so I’ll go into detail regarding from the torso up with form.
-Brace the abs properly as with every other movement pattern
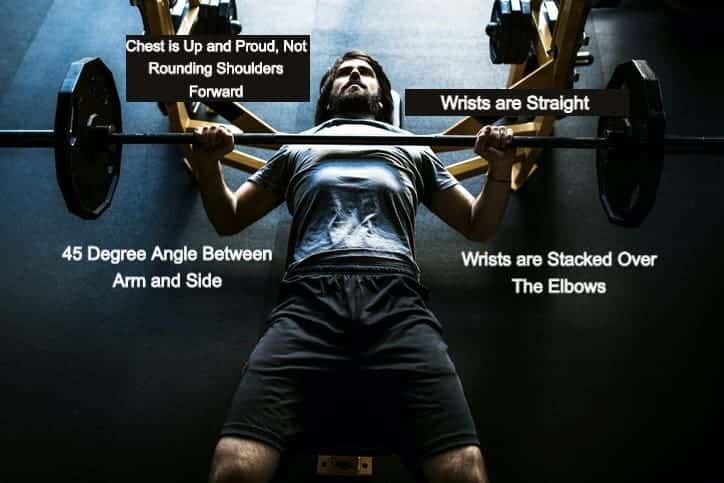
-This is the most important cue for upper body press. Keep your chest up! Now with some exercises such as a push-up, you’ll want movement in your shoulder blades but with an exercise like bench pres,s your shoulder blades will be pinned to the bench. In both cases howev,er if you keep your chest up and proud, you’ll naturally stabilize your upper back by keeping tension between your shoulder blades. The same concept is true with vertical overhead press movements. If you keep your chest proud and tall you’ll stabilize your shoulder blades which will prevent possible injury.
-I try and tell most of my clients with their dumbbell press, push-ups and bench press variations that they want to keep roughly a 45 degree angle in their arm pit. So if I’m looking at you head on during a horizontal pushing movement, I should see a 45 degree angle between your arm and side.
-If I’m looking at you head on doing a push up movement you should have your fists aligned an d stacked over your elbows
-Keep the wrists straight with both variation of pressing!
-An extra note on overhead press is don’t flare the elbows out super far towards your back, rotate the elbows forward a little bit, your shoulders will thank you.
Examples of Upper Body Push Exercises:
-Push Ups
-Bench Press
-Seated Dumbbell Overhead Press
-Dumbbell Z Press
-Incline Dumbbell Press
-Bottoms Up Kettlebell Press
-Bottoms Up Kettlebell Press
-Landmine Overhead Press
UPPER BODY “PULL”
Upper body pulling exercises are a crucial part for a proper workout program. These are especially important for today’s society where we are always looking down at our phones and computers. Looking down as much as we do and hunching over as long as we do causes our upper back to become inactive and weak. In the long run, this eventually leads to poor posture and neck/back pain. Often times people like to focus on the muscles we can see in the mirror, the chest, arms, abs and quads. The real power comes from the back. The back supports all those mirror muscles we love to look at and without a strong back you’re going to be looking at a weak undeveloped front side. Working on pulling exercises goes hand in hand with pushing exercises. The stronger you can get your back, the better your pushing exercises will be as well as your posture. I typically have my clients do 3:1 ration with pulling exercises. For every 1 push movement I Incorporate 3 back exercises at some point. I do this to balance out the body and make sure to let my clients know the importance of training the muscles you can’t see everyday. The hardest part of pulling exercises is understanding how to engage the back so you aren’t over compensating with surrounding muscles. Lets go over some tips for pulling exercises.
-When doing any variation of a pull you want to focus on using your back, I know this sounds basic but really think about using your back and not just pulling the weight to your body.
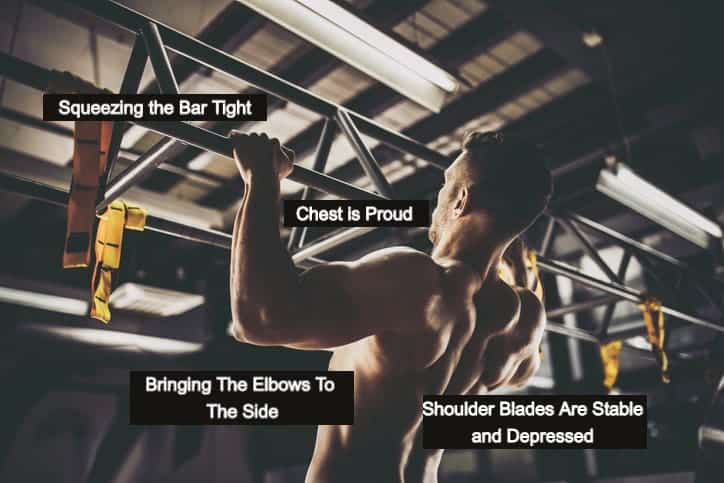
-Keep your chest proud with pulling exercises! Don’t let the chest collapse.
-If your shoulders are rounding or you’re shrugging at the end range of motion of the pull its too heavy for you and you need to drop the weight because this is your bodies way of compensating
-Elbow positioning will change based off of what pulling exercises you’re performing, but for general purposes when doing a horizonal row targeting your lats, think of elbowing someone behind you and don’t let the shoulders round!
-For vertical pulls like pull ups think of brining your elbows down to your sides!
-Time under tension when doing back exercises is an excellent way to feel what muscles you’re using.
-Grip the bar or dumbbell as tight as you can!
Examples of Upper Body Pull Exercises:
-Pull Up
-Chin Up
-Bent Over Row
-Kroc Row
-Pendlay Row
-Yates Row
-Narrow Grip Pull Down
-Lat Pull Down
LOADED CARRY
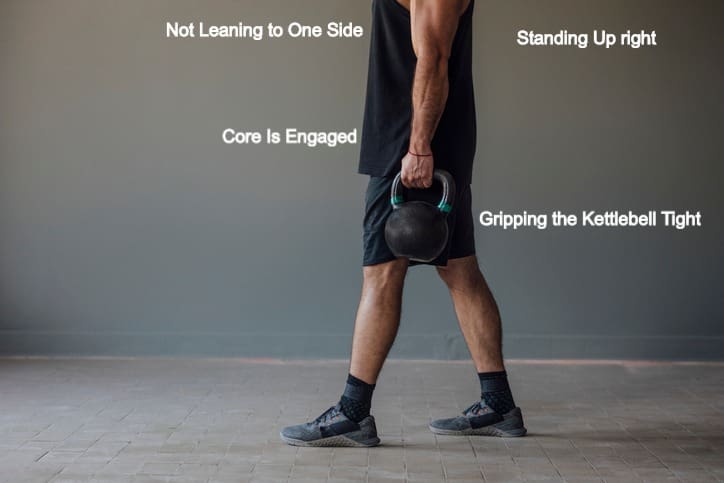
Last but certainly not the least. The loaded carry. This one is actually quite used outside of the gym in our everyday life without people realizing it. Carrying groceries ( of course we only do one trip, right?) , moving, carrying our packages from the mail room. There are tons of ways every day we carry things and its part of how we were meant to move and function. So why not get better at them and make your every day life a little easier? These are an excellent way to create stability throughout the torso and develop some serious strength in your back. Not to mention the forearm pump you’ll get with specific carrying exercises. This movement pattern is rare to see from most individuals in the gym and from many trainers as well. Your missing out on full body strength gains if you aren’t doing loaded carries! These teach you to create internal tension in your body while moving in a dynamic fashion. This is very important for athletes and anyone who wants to develop overall strength. The most common problem I see with these is lack of actually doing them. Aside from that I see a lot of people just pick up weight and carry it without thinking about creating tension and stabilizing their torso. The idea of a loaded carry is to make walking normal difficult. You job is to walk normal while adding an external factor to offset that. Lets go over some pointers for the loaded carry.
-Starting out to grab the weight to carry it, don’t ever just bend at the back to pick it up. Work that hip hinge or squat we talked about earlier! Your back will thank you.
-Now regardless of what type of carry you’re performing you want to limit twisting and leaning. You have to actively brace your entire torso while this inanimate object is telling you to do otherwise.
-With any carry, you want to make sure that your shoulders are stacked over your hips and you’re not off balance.
-Keep the chest proud and don’t shrug, we want to put tension in our entire back, not just the traps. If you shrug one of both sides you’re going to get less out of the carry.
-Actively think of keeping your torso as one big stone that can’t be moved or disturbed, let your body create all the tension to limit unnecessary movement.
-Carry heavy and safely!
Examples of Loaded Carries:
-Farmers Carry
-Front Rack Farmers Carry
-Offset Front Rack Carry
-Single Arm Farmer Carry
-1 Up 1 Down Carry
-Overhead Carry
-Sandbag Carry
-Zercher Carry
Those are the 6 foundational movement patterns essential for every day living and to progress in the gym. Don’t forget! Being lean, strong and healthy is a by product of eating clean and moving right! Focus more so on how you’re moving next time you’re in the gym vs. mindlessly moving to sweat and you’ll surprise yourself at what you are truly capable of with your fitness!
For strength & personal training, stop by Blinn Fitness at our Woodinville, WA location today!


